In this comprehensive guide, we will explore the step-by-step process of installing a garden pond liner. Whether you are a seasoned gardener or a novice, this article will equip you with the knowledge and skills required to successfully complete this project. From selecting the appropriate pond liner material to trimming and sealing the edges, we will cover each crucial aspect to ensure a professional and long-lasting installation. Get ready to transform your outdoor space with a beautiful garden pond.
Selecting the Right Pond Liner Material
When selecting the right pond liner material, it is important to consider factors such as durability, flexibility, and compatibility with the specific needs of the garden pond. The best pond liner material will provide long-lasting protection against leaks and damage, ensuring the longevity of the pond. Different pond liner materials offer various benefits. For example, EPDM rubber liners are highly durable and resistant to UV radiation, making them ideal for larger ponds or those exposed to direct sunlight. PVC liners, on the other hand, are more flexible and easier to install, making them suitable for ponds with irregular shapes. Additionally, PVC liners are often more budget-friendly. Ultimately, the choice of pond liner material will depend on the specific requirements of the garden pond, including size, shape, and budget constraints.
Measuring and Marking the Pond Area
Accurately measuring and precisely marking the pond area is crucial for ensuring the proper installation of the garden pond liner. Before starting the installation process, it is important to use effective measuring techniques to determine the dimensions of the pond. This can be done using tools such as a measuring tape or a laser distance measurer. These tools allow for accurate measurements and ensure that the pond liner will fit perfectly. Once the measurements are taken, marking tools such as chalk or spray paint can be used to outline the pond area. This helps to provide a visual guide during the installation process and ensures that the liner is placed correctly. By using precise measuring techniques and marking tools, the installation of the garden pond liner can be carried out smoothly and efficiently.
Clearing and Preparing the Pond Site
Before installing a garden pond liner, it is important to clear and prepare the site properly. This involves removing any existing debris such as rocks, branches, and other unwanted materials. Additionally, the pond area should be leveled to ensure proper water distribution and avoid any potential issues in the future. Lastly, clearing vegetation and rocks from the site will provide a clean and stable foundation for the pond installation.
Removing Existing Debris
To ensure the proper installation and functionality of the garden pond liner, it is imperative to meticulously remove any debris such as rocks, branches, and leaves from the pond site. Clearing the debris is an essential step in preparing the area for the liner. This process involves carefully inspecting the site and manually removing any obstructions that could puncture or damage the liner. Rocks should be carefully lifted and disposed of, while branches and leaves can be gathered and cleared using appropriate tools. Disposing of the debris properly is equally important to maintain the cleanliness and aesthetic appeal of the pond. It is recommended to dispose of the debris in designated areas or recycle them if possible. By effectively clearing and disposing of debris, one can ensure a smooth and successful installation of the garden pond liner.
Leveling the Pond Area
One important step in preparing the pond site is to level the area using a measuring tool to ensure an even surface for the garden pond installation. Leveling techniques are crucial to create a stable foundation for the pond liner. Begin by removing any rocks, roots, or other debris from the area. Then, use a measuring tool, such as a level or a laser level, to check the ground’s elevation. Adjust the soil by adding or removing it until the area is perfectly level. This will prevent water from pooling in certain areas and ensure a balanced water flow throughout the pond. Additionally, leveling the pond area is essential for checking for leaks once the pond is filled with water. A level surface will allow you to easily identify any water seepage or uneven water distribution.
Clearing Vegetation and Rocks
Clearing vegetation and rocks is an essential step in preparing the pond site, as it ensures a clean and debris-free area for the garden pond installation. Properly clearing vegetation techniques involve the removal of grass, weeds, and other plant matter that may impede the installation process or cause damage to the pond liner. This can be achieved by using tools such as a shovel, rake, or a handheld trimmer to cut and remove vegetation. It is important to remove the roots of the plants as well to prevent regrowth. Additionally, removing rocks effectively is crucial to create a smooth and even surface for the pond liner. Large rocks should be removed manually, while smaller rocks can be cleared using a rake or a wheelbarrow. By taking the time to clear vegetation and rocks properly, the installation process of the garden pond will be smoother, ensuring a successful and long-lasting pond.
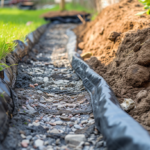
Excavating the Pond Area
The excavation of the pond area involves careful removal of the soil to create a suitable foundation for the garden pond liner installation. Excavation techniques play a crucial role in ensuring the success of the project. Before starting the excavation process, it is essential to plan the size and shape of the pond, as well as the desired depth. Proper measurement and marking of the area will help in achieving the desired result. When digging the pond, it is important to remove all the rocks and debris from the soil to prevent puncturing the pond liner. Additionally, creating a slight slope towards one end of the pond will allow for easier access and maintenance. Following these excavation techniques and pond liner installation tips will help in creating a beautiful and functional garden pond.
Installing Underlay and Protective Layers
When installing a garden pond liner, it is crucial to properly install underlay and protective layers. Underlay helps to cushion the liner and prevent any potential damage from sharp objects or roots. Choosing a suitable protective layer, such as geotextile fabric, adds an extra layer of protection against punctures and ensures the longevity of the pond liner.
Importance of Underlay
Installing a high-quality underlay is crucial for protecting the garden pond liner from potential damage caused by sharp objects or uneven surfaces. The underlay acts as a protective barrier, preventing any punctures or tears in the liner, which could lead to leaks and costly repairs. Additionally, the underlay helps to create a smooth and even surface for the liner to rest on, ensuring its longevity and stability.
When it comes to the importance of maintenance, using a professional installer can make a significant difference. A professional installer has the expertise and knowledge to properly install the underlay and liner, ensuring that it is done correctly and efficiently. They understand the importance of proper preparation and can address any potential issues that may arise during the installation process. Overall, hiring a professional installer not only saves time and effort but also guarantees a high-quality installation that will protect the garden pond liner for years to come.
Choosing Protective Layer
To ensure the longevity and durability of the garden pond liner, careful consideration must be given when choosing the protective layer, as it will serve as a crucial barrier against potential damage. There are several protective layer options available, each with its own benefits. One option is a geotextile fabric, which provides protection against punctures and abrasions. This fabric is also permeable, allowing water to flow through while preventing the growth of weeds and other unwanted vegetation. Another option is a layer of sand or gravel, which acts as a cushioning barrier and helps distribute the weight evenly across the pond liner. Additionally, using a protective layer can also help prevent the liner from becoming damaged by sharp objects or roots. Overall, choosing the right protective layer is essential for ensuring the longevity and durability of the garden pond liner.
Unrolling and Positioning the Pond Liner
Carefully maneuver the pond liner into place, ensuring it is smoothly unrolled and accurately positioned within the garden pond. The proper unrolling techniques and positioning tools are essential for a successful installation. When unrolling the liner, it is important to avoid any creases or folds that can compromise its integrity. Start by unfolding the liner at one end of the pond and slowly work your way towards the other end, making sure it lays flat and smooth. As you unroll, use positioning tools such as stakes or rocks to hold the liner in place temporarily. This will help to keep it aligned and prevent it from shifting during the installation process. Take your time and make any necessary adjustments to ensure a proper fit before moving on to the next step in creating your beautiful garden pond.
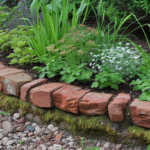
Securing the Pond Liner in Place
The use of anchoring devices is crucial for effectively securing the pond liner in place to prevent any shifting or movement during the installation process. Anchoring the pond liner is an essential step in ensuring the longevity and stability of the garden pond. There are various options available for anchoring the liner, including using rocks, bricks, or specially designed pond liner anchors. These devices help to hold the liner firmly in place, even in areas with high water flow or heavy rainfall. Additionally, adding decorative elements such as stones, pebbles, or plants around the perimeter of the pond not only enhances its aesthetic appeal but also provides further support to the liner, preventing any potential displacement. By properly anchoring the pond liner and incorporating decorative elements, garden pond owners can enjoy a beautiful and secure water feature in their outdoor space.
Trimming and Sealing the Pond Liner Edges
We recommend using a high-quality adhesive to effectively seal and trim the edges of the pond liner, ensuring a secure and watertight installation. When it comes to trimming and sealing the pond liner edges, there are several techniques and methods that can be employed. One common technique is to use a sharp utility knife or scissors to carefully trim any excess liner, ensuring a clean and neat edge. It is important to make precise cuts, taking care not to damage the liner material. After trimming, the next step is to seal the edges to prevent any leaks. There are various sealing methods available, such as using adhesive tapes or specialized sealants specifically designed for pond liners. These sealants provide a strong and durable bond, ensuring that the liner remains watertight for years to come.
Filling and Testing the Garden Pond
Once the pond liner is securely in place, it is essential to begin filling and testing the garden pond for any potential leaks or issues with water flow. Before adding water, it is crucial to test its quality to ensure it is safe for aquatic life. Conducting a water quality test will help determine the levels of pH, ammonia, nitrites, and nitrates. These parameters should fall within the appropriate range for fish and plants to thrive. Once the water quality is confirmed, the pond can be filled. As the water level rises, it is important to monitor for any leaks or signs of uneven water flow. After the pond is filled, it is time to add aquatic plants, which not only enhance the aesthetics but also provide oxygen and natural filtration for the pond ecosystem.