Last Updated on 24th December 2023
In this article, we will explore the process of repairing a chipped porcelain sink, providing step-by-step instructions and expert tips. A damaged sink can be an eyesore and compromise the functionality of your bathroom or kitchen. By following the proper techniques, you can restore the sink’s appearance and prevent further deterioration. Whether you’re a DIY enthusiast or a professional handyman, this guide will equip you with the knowledge and skills to effectively repair a chipped porcelain sink.
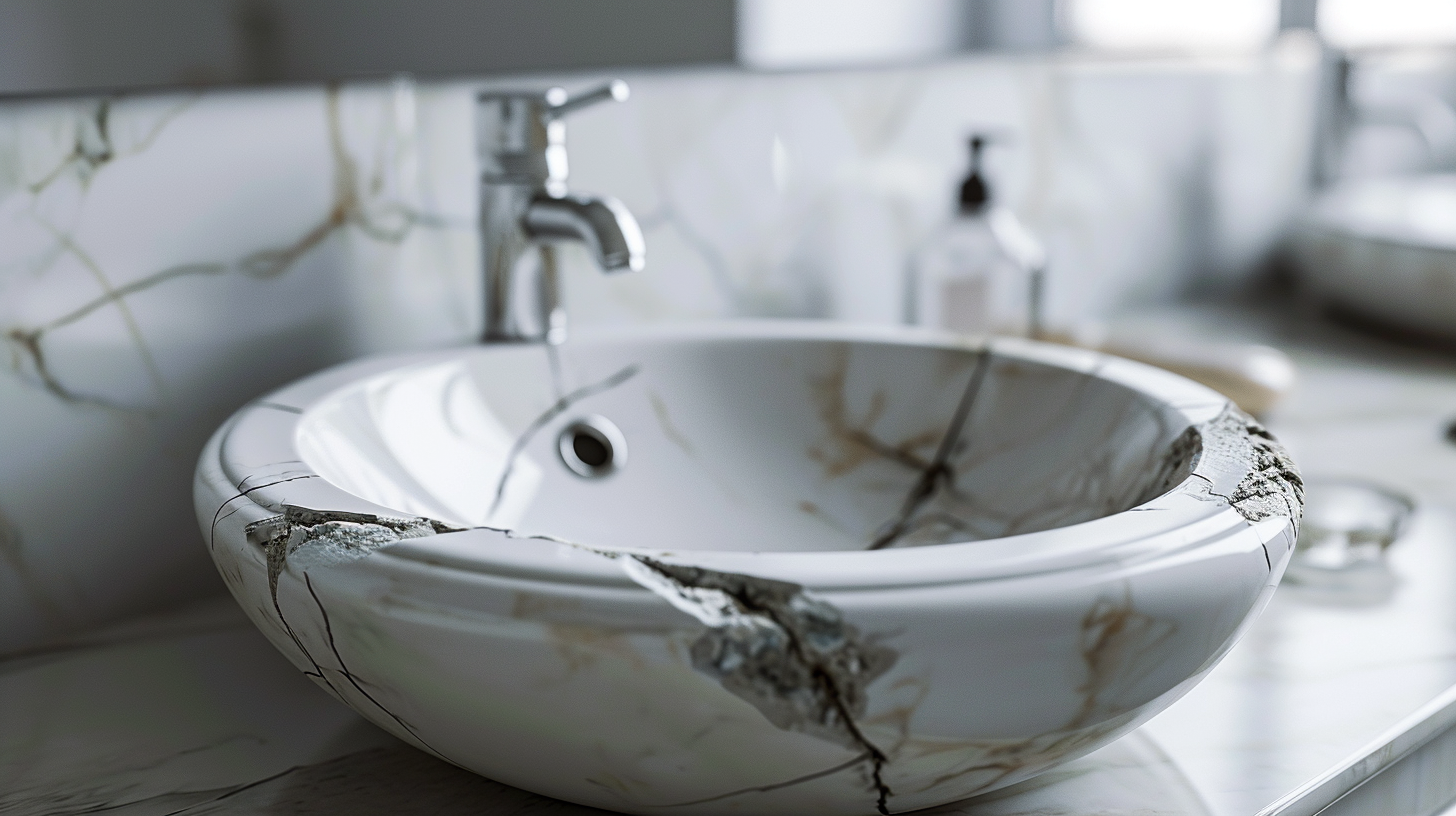
Assessing the Damage
To effectively address the issue at hand, it is crucial to thoroughly assess the extent of the damage to the chipped porcelain sink. Evaluating the options available for repairing a chipped porcelain sink is essential in determining the most effective and cost-efficient solution. The first step in this assessment is to examine the size and depth of the chip. A small, shallow chip may be easily repaired with a porcelain repair kit, which is a cost-effective option. However, if the chip is larger or deeper, it may require professional assistance. In such cases, the cost considerations need to be taken into account, as professional repairs can be more expensive. Additionally, it is important to consider the overall condition of the sink and whether the chip is a standalone issue or part of a larger problem, which could affect the evaluation of repair options and associated costs.
Gathering the Necessary Materials
For the successful repair of a chipped porcelain sink, careful consideration must be given to gathering all the necessary materials for the task at hand. The first step in any porcelain restoration project is to select a suitable repairing technique. Depending on the size and severity of the chip, options such as epoxy adhesive, porcelain filler, or even professional porcelain repair kits may be considered. Additionally, it is important to have the appropriate tools on hand, such as sandpaper, a putty knife, and a cleaning solution. These materials will aid in the preparation and smoothing of the damaged area before applying the repairing technique. By ensuring that all the necessary materials are gathered beforehand, the process of repairing a chipped porcelain sink can be executed smoothly and effectively.
Preparing the Surface
After carefully gathering all the necessary materials, it is essential to meticulously clean and sand the chipped area to prepare the surface for the repairing technique. Preparing the surface is a crucial step in the process of repairing a chipped porcelain sink. Firstly, the chipped area should be thoroughly cleaned using a mild detergent and a soft cloth to remove any dirt, grime, or grease that may be present. Once clean, sanding the surface is necessary to create a smooth and even base for the repair. Using a fine-grit sandpaper, gently sand the chipped area in a circular motion until it feels smooth to the touch. This step helps to remove any rough edges and promote adhesion between the repair material and the sink surface. By properly preparing the surface, the repairing techniques can be applied more effectively, resulting in a seamless and long-lasting repair.
Applying the Repair Compound
To successfully repair a chipped porcelain sink, it is crucial to apply the right repair compound. The choice of compound will depend on the type of damage and the material of the sink. Proper application techniques, such as using a small brush or spatula, will ensure a smooth and even application, minimizing the need for additional touch-ups.
Choosing the Right Compound
During the repair process of a chipped porcelain sink, it is essential to carefully select and apply the appropriate compound to ensure a seamless and durable restoration. Choosing the right compound involves considering various factors such as types and brands, as well as application methods and tools. When it comes to types of compounds, there are epoxy-based and acrylic-based options available. Epoxy compounds are known for their strength and durability, making them ideal for long-lasting repairs. Acrylic compounds, on the other hand, are easier to work with and offer a more seamless finish. As for brands, it is important to choose reputable ones that offer high-quality products. Application methods can vary depending on the compound, but typically involve mixing the components thoroughly and applying the compound to the chipped area with a putty knife or brush. By carefully considering these factors, one can ensure an effective and successful repair of a chipped porcelain sink.
Proper Application Techniques
Applying the repair compound to the chipped porcelain sink requires precise spreading techniques to ensure an even and seamless restoration. When it comes to repairing a chipped porcelain sink, proper application techniques are crucial for achieving a professional-looking result. The first step is to clean the damaged area thoroughly and make sure it is completely dry. Next, apply a small amount of the repair compound onto a putty knife or a similar tool. With steady and controlled movements, spread the compound over the chipped area, making sure to fill in any gaps or unevenness. It is important to feather the edges of the compound to blend it seamlessly with the surrounding porcelain. Lastly, let the compound dry and cure according to the manufacturer’s instructions before using the sink again. By following these sink repair techniques, you can effectively restore the chipped porcelain sink to its original condition.
Drying and Finishing Process
Ensuring the repair compound is evenly spread and the chipped area is properly filled, the drying and finishing process plays a crucial role in achieving a seamless restoration of the porcelain sink. After applying the repair compound, it is essential to allow it sufficient time to dry completely. This process typically takes around 24 hours, although it may vary depending on the specific compound used. Once the repair area is fully dry, the next step is to apply polishing techniques to blend the repaired area with the rest of the sink’s surface. Polishing can be done using a soft cloth or a buffing pad in a circular motion. Finally, to ensure long-lasting results, sealing the repaired area is recommended. This helps to protect the repair from moisture and further damage, creating a durable and aesthetically pleasing finish.
Smoothing and Finishing the Repair
To achieve a flawless restoration, it is important to meticulously sand and buff the repaired area, ensuring a seamless integration between the repaired portion and the rest of the porcelain sink. After the chipped area has been filled and allowed to dry, the next step is to smooth and finish the repair. This involves using a polishing technique to remove any excess filler material and to create a smooth surface. The key is to match the color of the filler material to the surrounding porcelain sink, ensuring that the repair is not noticeable. Careful attention to detail and a skilled hand are necessary to achieve a seamless finish. Once the repair is complete, the sink should look as good as new, with no evidence of the previous damage.
Maintaining the Repaired Sink
To ensure the long-term durability of your repaired sink, it is important to follow a few maintenance tips. Firstly, avoid using abrasive cleaners or scrubbing pads that can damage the repaired area. Secondly, regularly clean the sink with mild soap and warm water to keep it looking its best. Lastly, be cautious with heavy objects or sharp utensils to prevent any further chips or cracks.
Long-Term Durability Tips
Implementing proper cleaning and maintenance practices is crucial for the long-term durability of the repaired porcelain sink. After using durable repair materials to fix any chips or cracks, it is important to take steps to prevent future damage. One key aspect of maintaining the sink’s durability is regular cleaning. Using non-abrasive cleaners and soft cloths or sponges will help to avoid scratching the surface of the sink. Additionally, it is important to avoid using harsh chemicals or abrasive tools that can deteriorate the repaired areas. Another important step is to avoid placing heavy objects on the sink, as this can cause stress and potential damage. By following these maintenance practices, the repaired porcelain sink can maintain its durability and longevity for years to come.
Cleaning and Maintenance Advice
Regular cleaning and maintenance advice is essential for keeping the repaired porcelain sink in optimal condition, ensuring its longevity and durability. After repairing a chipped porcelain sink, it is important to properly clean and maintain the surface to prevent future damage. To start, ensure that the sink is thoroughly cleaned and dried before applying any protective coatings or sealants. This will help with surface preparation and ensure that the coating adheres properly. Use a non-abrasive cleaner and a soft cloth to clean the sink regularly, avoiding harsh chemicals that can damage the porcelain. Additionally, it is advisable to avoid placing heavy objects or sharp utensils directly on the sink surface to prevent scratches and chips. By following these cleaning and maintenance tips, you can extend the life of your repaired porcelain sink and prevent further damage.