Last Updated on 26th December 2023
In this comprehensive guide, we will explore the step-by-step process of repairing a cracked plaster ceiling. From assessing the damage to applying plaster patching compound and finishing with a fresh coat of paint, we will provide you with the knowledge and tools necessary to restore your ceiling to its former glory. With our professional expertise, you can confidently tackle this repair project and maintain a flawless finish for years to come.
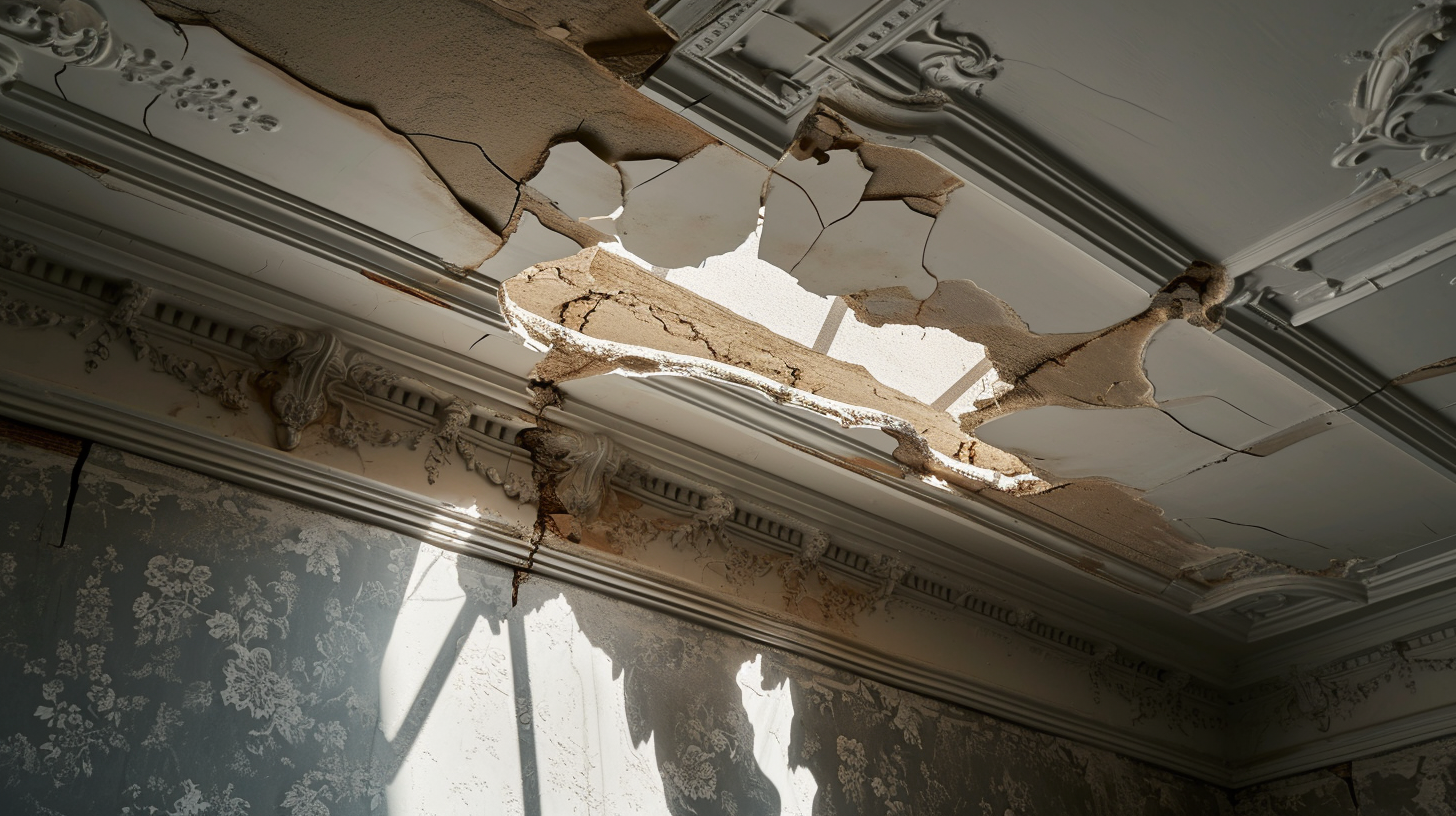
Assessing the Damage
In order to determine the extent of the damage to the plaster ceiling, a thorough assessment must be conducted by a professional contractor. Evaluating the severity of the cracks and understanding their cause is crucial in developing an effective repair plan. The contractor will carefully inspect the ceiling, looking for any visible cracks, sagging, or bulging areas. They will also examine the surrounding walls and ceiling to identify any potential structural issues that may be contributing to the damage. By determining the cause of the cracks, whether it be moisture, settling, or structural movement, the contractor can address the underlying issue and prevent further damage. This assessment is essential for developing an accurate cost estimate and determining the appropriate repair techniques required to restore the plaster ceiling to its original condition.
Gathering the Necessary Tools and Materials
The professional contractor should ensure they have all the necessary tools and materials for the repair of the cracked plaster ceiling. When it comes to choosing the right plaster repair techniques, it is important to consider the extent of the damage and the type of plaster used in the ceiling. Different techniques may be required for small cracks versus larger ones. Additionally, finding professional plaster repair services can be beneficial as they have the expertise and experience to perform the repairs efficiently and effectively. They also have access to specialized tools and materials that may not be readily available to the average homeowner. By engaging professional services, one can ensure that the repair is done properly, minimizing the risk of further damage and ensuring the longevity of the repaired plaster ceiling.
Preparing the Work Area
Before starting any repair work on a cracked plaster ceiling, it is crucial to properly prepare the work area. This involves covering furniture and belongings with drop cloths or plastic sheets to protect them from dust and debris. Additionally, any light fixtures or ceiling fans should be safely removed to ensure a clear and safe working environment.
Covering Furniture Properly
To ensure proper protection, furniture should be covered with plastic sheets or drop cloths while preparing the work area. This step is essential in preventing any accidental spills or splatters from damaging the furniture during the painting process. When choosing the right paint color, it is important to consider the overall aesthetic of the room and the desired mood. Different colors can evoke different emotions, so it is crucial to select a color that aligns with the intended atmosphere. Additionally, using protective drop cloths is essential to keep the work area clean and tidy. Drop cloths can catch any paint drips or spills, preventing them from staining the floor or carpet. By taking these precautions, you can ensure that your furniture remains safe and your work area stays clean while painting.
Removing Light Fixtures Safely
One important step in removing light fixtures safely is to carefully disconnect the electrical wires and secure them with wire nuts and electrical tape, ensuring no exposed wires are left behind. When it comes to light fixture installation, safety precautions are essential to prevent accidents and ensure a successful project. Before starting any work, it is crucial to turn off the power to the fixture at the circuit breaker. This will minimize the risk of electric shock. Additionally, using a voltage tester to confirm that the power is off is highly recommended. When handling the light fixture, it is important to be cautious and avoid touching any live wires. Furthermore, using a sturdy ladder or step stool and having a helper to assist with the removal and installation process can help prevent injuries. By following these safety precautions, individuals can safely remove and install light fixtures in their homes or workplaces.
Stabilizing the Cracked Area
To begin stabilizing the cracked area, it is important to first fill the cracks with a suitable filler material. This will help prevent further widening or shifting of the cracks. Once the cracks are filled, reinforcing with mesh is recommended to provide additional support and strength. Finally, applying joint compound over the mesh will help create a seamless finish and ensure the stability of the repaired area.
Filling the Cracks
Two common methods for filling the cracks in a plaster ceiling are using joint compound or plaster of Paris. When it comes to repair techniques, it is important to understand the common causes of cracked plaster ceilings. These can include structural movement, moisture damage, or simply the natural settling of a building over time. Once the cause of the cracks has been addressed, filling them is the next step in the repair process. Joint compound, also known as drywall mud, is a popular choice as it is easy to work with and dries quickly. Plaster of Paris, on the other hand, is a more traditional option that offers a stronger and more durable finish. Ultimately, the choice between joint compound and plaster of Paris will depend on the severity of the cracks and the desired outcome of the repair.
Reinforcing With Mesh
After addressing the cause of the cracks in the plaster ceiling, reinforcing techniques are essential to ensure a durable and long-lasting repair. One effective method is to stabilize the cracked area by installing mesh and securing it in place with joint compound or plaster of Paris. Mesh installation involves carefully positioning the mesh over the crack, ensuring it covers the entire affected area. The mesh acts as a support system, preventing further cracking and providing a sturdy foundation for the repair. Once the mesh is in place, it can be secured using joint compound or plaster of Paris, ensuring a strong bond with the surrounding plaster. This reinforcement technique not only strengthens the cracked area but also helps to prevent future cracks from forming, providing a reliable and lasting solution to plaster ceiling repairs.
Applying Joint Compound
Using a trowel and joint compound, carefully spread a thin layer over the mesh to ensure complete coverage and a smooth finish. Applying joint compound is a crucial step in repairing a cracked plaster ceiling. This versatile material not only fills in the cracks but also provides a seamless surface for further refinishing. To achieve a professional-looking result, it is essential to employ proper smoothing techniques. After applying the joint compound, use the trowel to flatten and level the surface, ensuring that it is even and free from any bumps or ridges. Smooth the compound by feathering the edges, blending it seamlessly with the surrounding plaster. Take your time and be patient when smoothing the joint compound to achieve a flawless finish that will restore the beauty and integrity of your plaster ceiling.
Applying Plaster Patching Compound
The application of plaster patching compound is a crucial step in repairing a cracked plaster ceiling. Before applying the compound, it is essential to prepare the surface properly. This involves removing any loose or damaged plaster, cleaning the area thoroughly, and ensuring it is dry. Once the surface is prepared, the next step is to apply the plaster patching compound. This compound is specially formulated to adhere to plaster surfaces and provide a smooth finish. When applying the compound, it is important to use a smoothing technique to ensure an even and seamless repair. This can be done using a trowel or putty knife to spread the compound evenly and remove any excess. By following these steps, you can effectively repair a cracked plaster ceiling and restore its original appearance.
Sanding and Smoothing the Surface
One important step in the repair process is to carefully sand and smooth the surface to ensure a seamless finish. Smoothing techniques and the use of proper sanding equipment are essential in achieving the desired result. When sanding a cracked plaster ceiling, it is important to start with a coarse-grit sandpaper to remove any rough or uneven areas. This helps to level the surface and create a smooth foundation for further repairs. Once the rough patches have been smoothed out, a finer-grit sandpaper should be used to further refine the surface. It is important to use a light touch and apply even pressure when sanding to avoid creating grooves or unevenness. Additionally, using sanding equipment such as sanding blocks or orbital sanders can help to achieve a more uniform finish. By employing the right techniques and using the appropriate sanding equipment, it is possible to achieve a flawless and professional-looking result.
Priming the Repaired Area
To ensure optimal adhesion and a seamless finish, apply a high-quality primer to the repaired area after sanding and smoothing the surface. Priming techniques play a crucial role in the success of any repair project. When it comes to repairing a cracked plaster ceiling, choosing the right primer and applying it correctly is essential. Primers act as a bonding agent between the repaired area and the new paint, preventing future cracking and promoting long-lasting durability. It is important to consider drying time when priming the repaired area. Allow sufficient time for the primer to dry completely before applying the final coat of paint. This ensures that the paint adheres properly and provides a smooth, flawless finish. Following proper priming techniques and considering drying time will result in a professional-looking repair job.
Painting the Ceiling
When painting the ceiling, it is imperative to use a drop cloth and painter’s tape to protect surrounding surfaces, while also ensuring even coverage by applying the paint in smooth, overlapping strokes. Painting techniques play a crucial role in achieving a flawless finish. One important technique is to start painting from one corner of the room and work your way across in small sections, using a roller or brush. This ensures that the paint is applied evenly and prevents streaks or uneven patches. Additionally, choosing the right paint color is essential to create the desired atmosphere in the room. Consider factors such as lighting, room size, and existing decor when selecting a paint color. It is also helpful to test the color on a small area of the ceiling before committing to painting the entire surface. By using proper painting techniques and selecting the right paint color, you can transform an ordinary ceiling into a stunning focal point.
Maintaining and Preventing Future Cracks
Implementing regular inspections and applying proper sealants are essential steps in maintaining and preventing future cracks in plaster ceilings. Cracks in plaster ceilings are a common issue that many homeowners face. These cracks can occur due to various reasons such as settling of the house, temperature changes, or even poor construction. However, it is important to address these cracks as soon as possible to prevent further damage. One way to repair hairline cracks is by using a flexible joint compound that can expand and contract with the movement of the ceiling. This compound should be applied carefully, filling in the crack and smoothing it out. Additionally, proper sealants should be applied to the entire ceiling to prevent future cracks from forming. Regular inspections should be conducted to identify any potential issues and address them promptly. By taking these preventive measures, homeowners can maintain their plaster ceilings and prevent future damage.